The LED becomes bright because it turns the current of electrical energy into light energy (photons are waves of light). The symbol (Schematic symbol) for an LED looks like so:
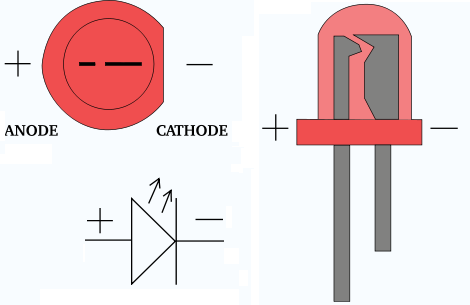
This picture is even more helpful because it labels the Cathode and Anode of the LED. Do you see the arrows pointing out from the triangle in the schematic symbol? That is light energy that is released when the electricity passes from the Anode to the Cathode. A Cathode is known as the "Negative Lead" and the Anode is called the "Positive Lead."
The light waves (photons) are created when the electricity arcs over from the PLUS (+ Anode) lead to the MINUS (- Cathode) lead of the LED. An led runs on a minimal amount of electricity (about 1.5 to 2 V). The larger the LED, the more electricity it will most likely need to function.
The Anode, the positive and longer side of the LED, also can be identified by the flat side of the LED. This is handy when you have leads that are the same length.

If you have heard of an electric arc then that is what you should think of an LED light as. A very small electric arc. The material used in the LED determines the color it will create; not the color of the plastic. Usually the plastic will be the same color as the light, but on occasion you will be using white colored LED's that release blue, red, green light. An LED supplied with too much power will break, similar to that of a fuse, but the LED is not created to be used as a fuse (fuses break upon excessive current (Amperes).
If you wish to use an LED in any project:
-buy an appropriate resistor for each LED you purchase. 1k Ohm would work in most DIY projects (BROWN - BLACK - RED - ANY). For most projects the fourth band of the 4-band resistor is gold. when a 4th band is golden, it has a 5% tolerance.

http://www.kpsec.freeuk.com/components/led.htm
http://fuse.pha.jhu.edu/~wpb/spectroscopy/basics.html


No comments:
Post a Comment