SEARCH W7R

Sunday, February 26, 2012

Negative Binary Numbers Should Be Easy!

1. Unsigned and Signed Binary Numbers
 Unsigned binary = all numbers are positive (AKA no negative binary numbers allowed)
  Signed binary = Both positive and negative binary numbers. This is what we are concerned with.

2. The Most Significant Bit (MSB)
MSB or the Most Significant Bit is the binary digit (bit) furthest to the left. For example, the MSB of 0101 (unsigned binary) is the 0 on the left because its potential value 1*2^3 or 8 (decimal) is the most significant!
In the decimal system the MSB has the highest weight (value) always. This however, is not always the case for binary numbers.

3. Negative Weight of the MSB
Negative weight is present only in the MSB of a signed binary number. A non-signed binary number has positive weight for all of its bits because there is an unknown system size. The MSB (furthest bit to left) is weighted negatively if has the value 1.

For example, a nibble (4-bit unit) of 0111 would have no negative weight, thus would be positive. Specifically 0111 would be +7 (decimal), but what would -7 be? 1001 is -7. This occurs because the MSB of 1001 is negatively weighted and -8 + 1 would be equal to -7.

 In signed binary numbers a number will always have 1 more negative value for every positive value in its system. For example, a nibble (4-bit unit) is the most positive at 0111 which is 7 in decimal, when the most negative value for the 4-bit unit is 1000 (-8). So, to find the complement of any positive binary number would be to switch all bits of 0 to be 1's and 1 to be 0's (inverting the number) followed by adding positive 1. 

4-Bit System potential bit values:  [-8] [4] [2] [1]
8-Bit System potential bit values: [-128] [64] [32] [16] [8] [4] [2] [1]
All binary systems are limited to a finite state of values.


Free Circuit Design Software

Circuit design programs such as National Instruments, MultiSim 11 are great tools, but costs a lot of money and includes many features that most people, especially, digital electronics enthusiasts, novices, and students would never need. After a few months of searching and experimenting, I was able to compile this list of completely free circuit design software. I can promise you all of the following free alternative circuit design programs on this post are excellent programs. LINKS FOR ALL SOFTWARE ARE INCLUDED!

1. Multimedia Logic
A screenshot of a circuit built with MMLogic.
Softronix's Multimedia Logic
MMLogic, the interactive logic simulation software is both, free and open source! Since this program is open source, that means that its users can create their own modifications of the application to enhance the features it already has. If you are a programmer, this option should be even more appealing because you can see all of the source code for the program. Also, this program is very easy to navigate because it contains generic pieces such as individual AND-gates instead of a 74xx08 integrated circuit and has an easy to use Design Palette for selecting, editing, and placing components. A lot of fun! If I had to pick a negative about this program, it would be that there isn't so many pieces and options available in the standard library you use upon download.
Go to download page: Multimedia Logic v1.4


2. MultiSim 8 - Student Edition (FREE)
The student edition of Multisim has distinct differences from the professional (payed for) version of the software. The Differences. Multisim is a very professional program, but contains many parts even I have not touched. Compared to MMLogic (above) this program is much harder to learn to use because it contains so many resources. MultiSim 8 has the largest amount of resources and components than any of the other circuit designing software on this post.


Go to download page: Multisim Academic Evaluation (Multisim and Ultiboard)


3. Logisim
Snapshot of a Logisim project
Logisim is similar to MMLogic (the first item) in appearance and control, but has a larger library of content for you to use than MMLogic. For example, MMLogic has only one type of Arithmetic Logic Unit (ALU) that limits you to using 8-bit length data, but Logisim has a total of 9 different ALU components that can use any bit length from 1 to 32.   Logisim is a great balance between the detailed but complicated Multisim 8 (2nd item on list), and the friendly and simplified environment of MMLogic. 
Go to download page: Logisim on SourceForge


4. Logic Circuit Designer
Logic Circuit Designer is specialized to be used for logic circuit creation as opposed to full on electronics systems. The layout is very easy to understand and has only the absolutely necessary components you would need to create your logic circuits. The reason you may like this one over MMLogic (2nd on the list) is because the click and drag function creates wires by default, sadly, MMLogic needs 1 more button click for each connection when compared to Logic Circuit Designer. Logic Circuit Designer also allows you to specify the angle at which a component is facing. This is not available in Logisim or MMLogic.
Go to download page: Logic Circuit Designer

Tuesday, February 21, 2012

How to Search Google by Image


Searching with Images is a lesser-known feature of the google search engine. I am going to explain how to search the web with an image by means of Google's search engine. For specific details on how it works click here!

How To Search With An Image
First, visit google.com and search for anything you are interested in. Then, go to the top where it says, "Images," and see the image results for your regular search key words. Now select an image that you would like to search the web with. Drag that image up into the search bar and the chrome web browser will prompt you to drop here to search with this image. Release your mouse clicker, allowing the image to be used as a search source. The results are not limited to other images! Just like the traditional text key words you  search Google with all of the time, you have the ability to switch your target types of results by clicking any of the tabs above your results. The tabs include web, images, Youtube (video). TRY IT OUT NOW! 

Some extra tips:
1. You cannot copy and paste the images into the google search box for search with images.
2. Google has filters that may distort your results (or enhance them).
3. You can search with a picture and text to get the best of both worlds.
4. This feature will be most effective with Google Chrome internet browser.
5. You can drag thumb nails from results (images) into the search by images box without actually visiting the website directly.

Have fun!
-Brian R.H.

Monday, February 13, 2012

Valentines Day Cards for FREE!

Source: http://www.pictures88.com/p/valentines_day/valentines_day_012.jpg


Let's make valentines day more affordable!
If you don't think paying  $5.00 US dollars for a valentines card is a total ripoff, then be my guest and buy it. However; you could be make a better and/or more personalized V-day card in under 10 minutes.


Option #1: Card Idea + Creativity

  1. Visit a grocery store to browse the valentines day cards. Or browse cards online  Google Images

  2. Find the Valentines day card you like the most (that you would normally buy)

  3. Write down the parts of the card that made you want to buy it (Images, Quotes, Poems, Ideas, Jokes)

  4. Go home without buying the Valentines day card and log on to your computer.

  5. Search google for the card you were going to buy by means of the content you wrote down in step #3.

  6. Reconstruct your own version of the card (be creativity!). Print out pictures, and text you want on your V-day card.

  7. Write a message for the reciever and Voula! You got yourself a cheaper card in little to no time.


Option #2: 1 Minute Card

1. Search the internet for a card that you can print. (Image Search Results for "V-day cards")
2. Print the card out and fix any notable mistakes due to formatting.
3. Fold the card and sign your name with any message you want to add.


Option #3: Online Valentine's Day Card Creators!

Pick from any of the sites listed:
http://ivyjoy.com/printcards/valentine.html


Option #4: A Heart Shaped Collage

1.Find a collage creation site or program (Such as: http://www.photovisi.com/)
Also, collages can be created in the Microsoft Word program. How To: Collages With Word


OTHER V-DAY RESOURCES ONLINE

Sunday, February 12, 2012

The 74xx00 NAND Gate Integrated Circuit

The NAND Gate (Schematic symbol and truth table)
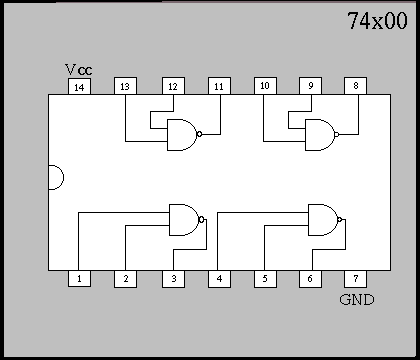
The 74xx00 contains 4 NAND gates which each independently consist of 2 inputs, A,  B, and one output C (Pin names are arbitrary; they could also be inputs, P, Z and output, X) The NAND gate is considered universal because a configuration of NAND gates can function as all the logic gates: AND, OR, NOT, NOR, NAND, XOR, XNOR. For example, to form a NOT gate purely of NAND gates would one input to be in contact with the other, so that only one value (1 or 0) enters both of the inputs. Doing that cuts out the two middle sections of the truth table shown above. Creating other logic gates by means of NAND gates is called NAND Implementation. So, with one 74x00 integrated circuit chip you could create two NOT gates. That is less efficient than just using a 74x04 chip, but may be preferred when purchasing chips in bulk. Prices are low in bulk purchases, and only having one type of gate can save employees or engineers the trouble of reading which chip they are using because they all would be 74x00.

Here is a MultiSim snapshot of all other types of gates using only NAND gates. This is known as NAND logic implementation. 
MultiSim 8 screenshot of NAND Implementation
74x00  Pin out diagram. Vcc is power and GND is ground. 

Saturday, February 11, 2012

Hardware VS Software

Hardware and software are the components that all computers rely on to function properly. Hardware is all of the physical parts of a computer such as the monitor, the motherboard, USB ports, the hard drive. Any part of an electronic device such as a computer or laptop, that is visible to the human eye is hardware. If you take a computer open hardware is what you would see. Software is the programs and invisible side of the computer. You cannot see a binary digit of electricity by the human eye, but it is there. Software is programs, which can be thought of as directions to be read by the computer.

HARDWARE: The physical components of computers.
Examples of HARDWARE

The most important hardware in the computer (physical parts): 
-Central Processing Unit (CPU)
-Volatile Memory storage unit (RAM)
-Harddrive (for long term storage of information)


SOFTWARE: The virtual component of computers.


Common examples of Software (invisible parts):
-Computer games
-Video games
All of googles services are examples of SOFTWARE
-Microsoft (Operating System)
-Paint application
-Ipod apps
-Android apps
-Google chrome Internet Browser
-Internet Explorer
-Safari Internet Browser

Ipod/Itouch/Iphone apps are an example of SOFTWARE


Sunday, February 05, 2012

Objects and Classes in Java: The Complex Data Type

The idea and use of CLASSES, and OBJECTS are frequently over-complicated. In this Java post, I will show you how simple, but important the concept of objects and classes is. We will explore the ideas behind O.O.P. (Object Oriented Programming), also called O.O.D.  (Object Oriented Design) and expose one of the most important concepts of modern day programming.

OBJECT ORIENTED DESIGN (O.O.D.)
~PROGRAMMING in Java
Everything starts with a problem. How does a programmer create variables other than the primitive types (integers, characters, doubles, booleans, longs, ect.)? The answer is surprisingly simple: Combine and mix any number or types of primitive variables and place them all in a container. This container would be the OBJECT, while the contents would be the OBJECTS' LOCAL VARIABLES. In Java programs, object variables are called CLASS VARIABLES! So, class variables are the same thing as object local variables. Knowing that class variables are the contents of an object variable in Java, you may already have an idea of what an object in Java programs is: CLASSES. 


A drawing of what a real Dinosaur would look like (Triceratops)

public class Dinosaur{
//What variables does a dinosaur need?
}

public class Dinosaur{
//here's a few for starters.
public int length, height, weight;
}

As you can see (above) my Dinosaur class has 3 class variables, in which any of the 3 can be thought of as a trait that better describes a Dinosaur. The more class variables a class contains, the closer it can emulate an actual dinosaur of the Jurassic period. Of course, these class variables need to be appropriate for the subject at hand; like, I would not include a variable such as a String named bestMagicTrick. That'd be a new skill of dinosaurs... that's for sure.

All classes of a Java program extend a class called Object. So, every class variable can also be referred to as a object, but more often an instance of a class. 

The primitive variables have a class version for their uses such as changing a integer into a String. The int keyword is equivalent to an instance of the Integer class (Integer.java). To create an integer from a string you use the parseInt(String s) method of the Integer class.

Integer.parseInt("564") = = 564 should be TRUE! Check it out yourself.

Back to the thought of emulating real life into computer programs, our Dinosaur class could use some ACTIONS. These actions we will call methods (sound familiar?) For example, a dinosaur would have an eat method, a move method, a roar method.


public class Dinosaur{
//here's a few for starters.
public int length, height, weight;


public void roar(){
//roar method contents
}
public void move(String direction, double length){
//move method contents
}
 public void eat(){
//eat method contents.
}
}


Our dinosaur object is more of a dinosaur than it has ever been. To create an instance of a Dinosaur class we simply write Dinosaur dino1 = new Dinosaur();

I am eager to go further into this topic of Objects and Classes, but I think this is enough for one post. I hope you enjoyed the lesson!
 -Brian

MORE RESOURCES ON OOP/OOD in JAVA

Wednesday, February 01, 2012

Understanding HTML in your Blogger Posts

In Blogger there are two basic ways of posting, by composing, or by HTML-ing. Who says you can't use a little of both. Normally I write the posts for my blog in 'Compose' mode while making final touch-ups in the 'HTML' mode. These modes can be toggled by pressing the two rectangles labels 'Compose' and 'HTML' located on the top right of the blog post writing space.


If you unfamiliar with HTML, CSS, Javascript, XHTML, or XML, the 'HTML' writing mode can be overwhelming and confusing. This post will be aimed toward eliminating those misunderstandings and to help you learn to fix up posts with the 'HTML' mode setting in your Blogger post working environment (where you write the posts).

Here are some common "tags" (keywords) that are important to understand:
To Next Line
<br /> this is the equivalent of pressing the Enter key on the keyboard / it skips down to the next line and continues its HTML content from there.

Horizontal Lines For Splitting Up Content
<hr /> this is a great way to seperate ideas (very effective). It is a horizontal rule (a horizontal line across the page). These horizontal rules are being used to separate this posts content  into parts!

Links
<a href="www.google.com">click here to link to google</a> The letter a stands for anchor (kind of weird, I know) and this is a way of having text as a link

Bold, Italics and Underline (Formatting Tags)
<b>this makes text bold</b> or <strong> this is bold as well  </strong>
<u>this makes text underlined</u>
<i>this makes text italicized</i> or <em>this is italicized too</em>

Paragraphs
<p> These paragraph tags can be used to define a paragraph. All of the text inside it is displayed as plain text, but can be assigned these things called Attributes.</p>

 Font Types

<p style="font-family:impact">This is a paragraph with impact font</p>
This is a paragraph with impact font

<p style="font-family:verdana">This is a paragraph with verdana font</p>
This is a paragraph with verdana font

<p style="font-family:time new roman">This is a paragraph with times new roman font</p>
This is a paragraph with times new roman font

<p style="font-family:arial">This is a paragraph with arial font</p>
This is a paragraph with arial font

<p style="font-family:courier">This is a paragraph with courier font</p>
This is a paragraph with courier font

<p style="font-family:algerian">This is a paragraph with algerian font</p>
This is a paragraph with algerian font

<p style="font-family:monospace">This is a paragraph with monospace font</p>
This is a paragraph with monospace font

<p style="font-family:playbill">This is a paragraph with playbill font</p>
This is a paragraph with playbill font

The style keyword is an attribute for the p (paragraph) tag. More Fonts In HTML!